How To Install & Remove Clek Booster Seat Full Guide 2024
wondering How to Install & Remove a Clek Booster Seat? No worries; this guide will show you how!
Juggling life with kids can be a whirlwind! From carpools to lunchtime battles, there’s a lot to keep track of. But one thing shouldn’t add to the stress: installing your Clek booster seat.
This guide will show you how to quickly and easily install, adjust, and remove your Clek booster seat. And make sure your car seat fits your child perfectly. So buckle up; we’re making car safety a breeze!
How to Install, Adjust & Remove Clek’s Booster Seat (with fullback mode)
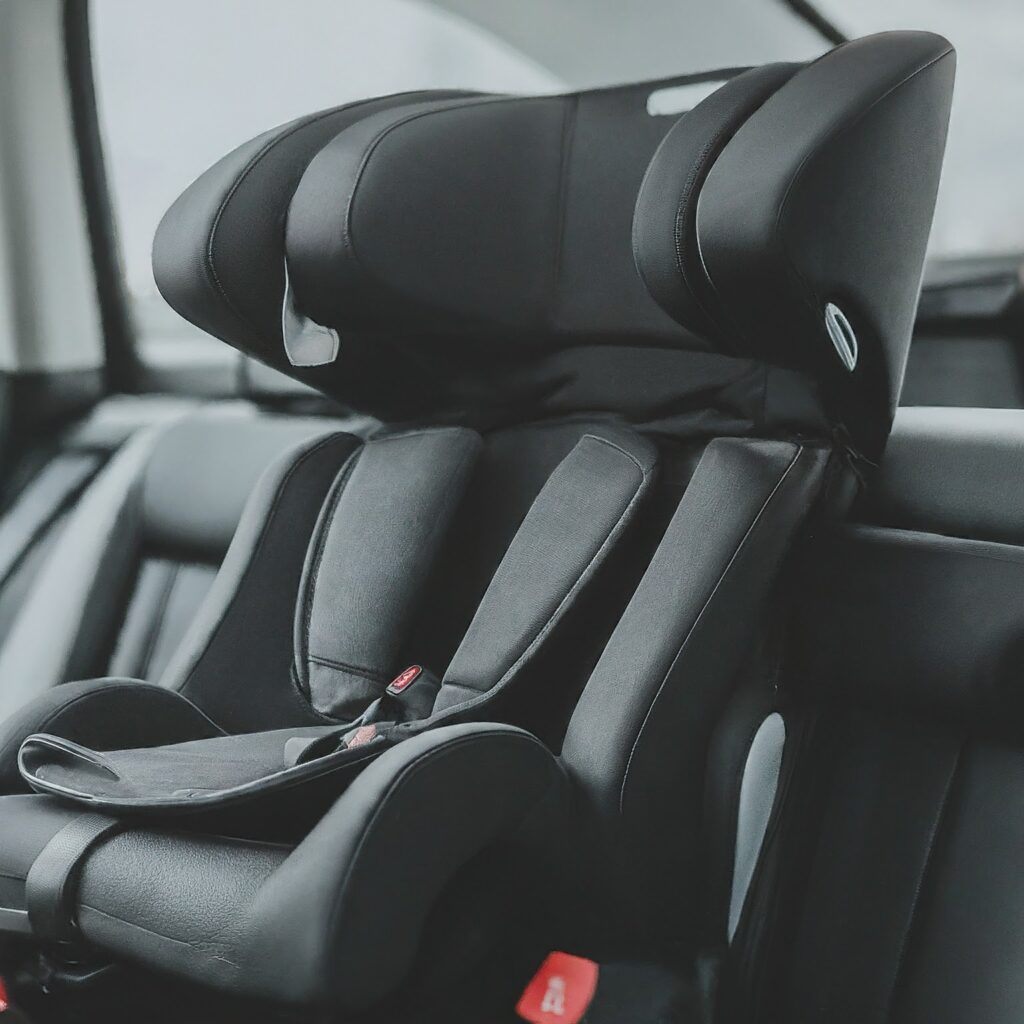
Installing Clek Booster seat
Keeping your child safe on the road is a breeze with your Clek booster seat! Here’s how to install and remove it in a few simple steps:
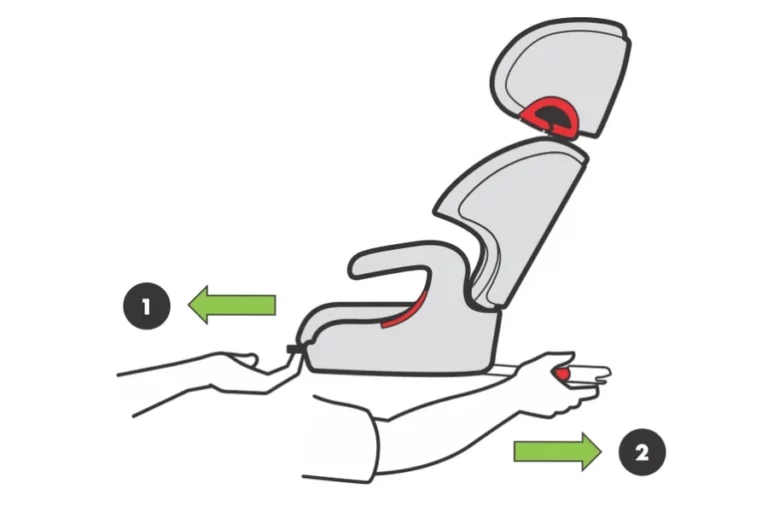
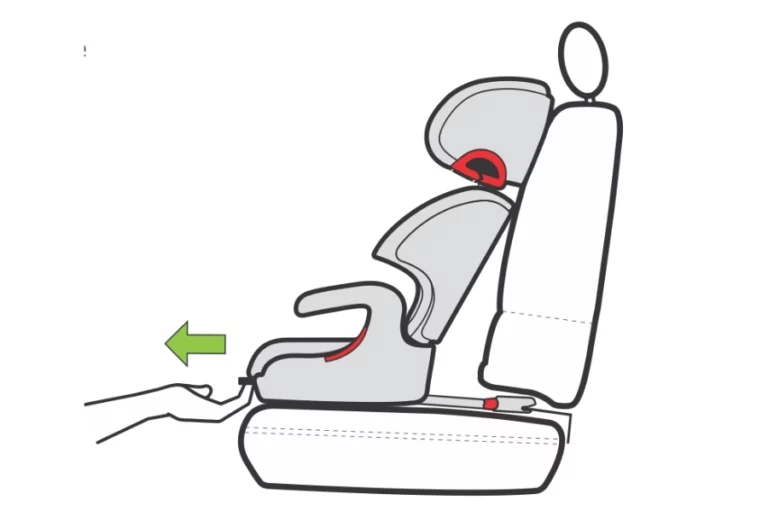
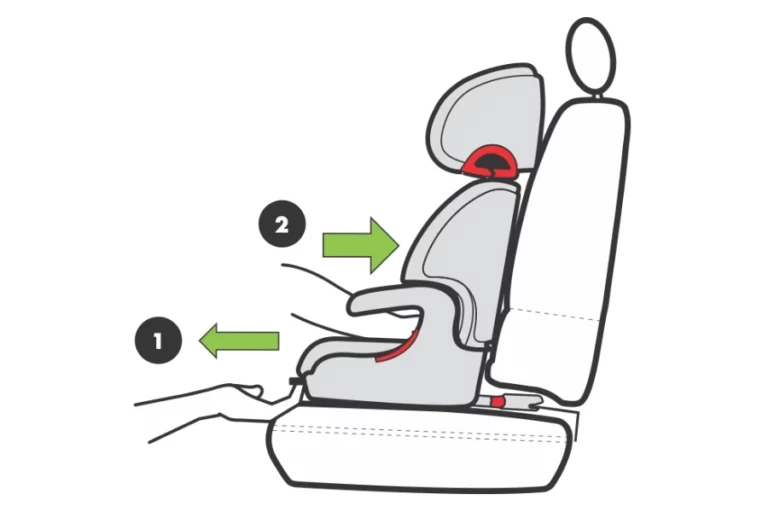
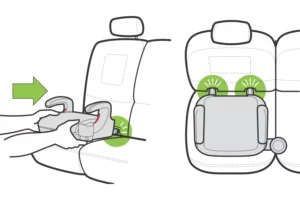
- Extend the latch connectors: Pull the recline handle on the front of the seat towards you with one hand. and at the same time pull the latch connectors and extend them outward.
2. Look between the seat back and bottom cushion of your car seat for the LATCH anchors. These are usually metal loops or bars.
3. Click and connect: Line up the LATCH connectors on your booster seat with the anchors in your car. Push the connectors firmly until you hear a satisfying “click” for a secure attachment.
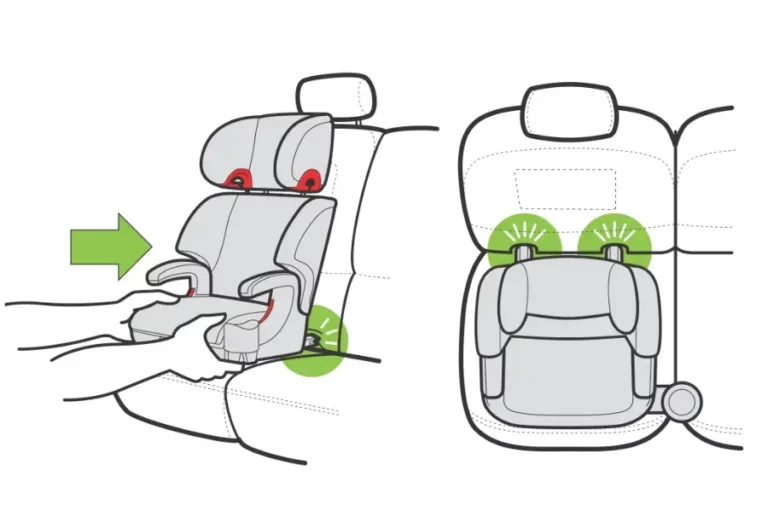
4. Test the fit: Give the booster seat a little tug to check that it’s fastened tightly. There shouldn’t be much movement.
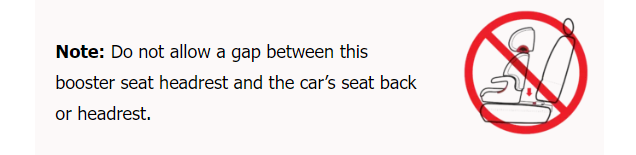
5. Snug seat: Make sure the booster sits flat against the back of your car seat for a secure fit.
Adjusting Clek booster seat to a reclined position
Want to make car rides even more comfortable for your little one? Your Clek booster seat might have a handy recline feature! Here’s how to adjust it:
- Find the recline handle on the front of the booster seat base.
- Grab the handle and pull it towards you. This will unlock the seat and allow you to recline it.
- Slide the seat back until it’s at the desired angle for your child’s comfort.
- Once you’ve found the perfect position, let go of the handle to lock the seat in place.
- Make sure the headrest of the booster seat stays in contact with the headrest or back of your car seat for proper support.
Going back upright? It’s just as easy:
- Grab and hold the recline handle again.
- Push the booster seat forward towards the back of your car seat.
- Let go of the handle when the seat is upright, and it will automatically lock into place.
Removing Clek Booster Seat
Ready to take your booster seat out? Here’s how to detach it in a snap:
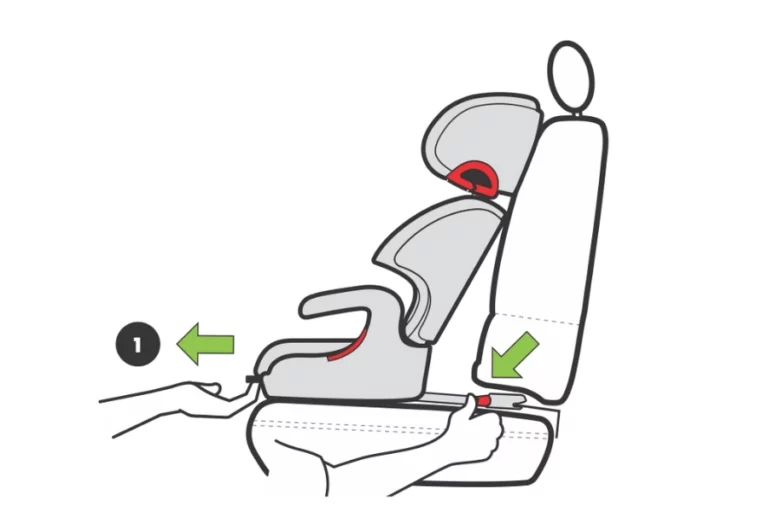
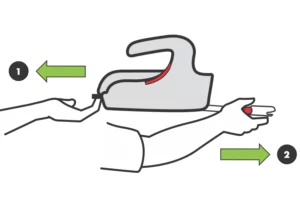
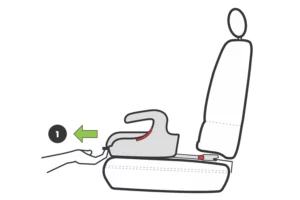
- Unlock and Extend: Grab the recline handle on the front of the seat base and pull it towards you. This unlocks the seat and extends the LATCH connectors underneath.
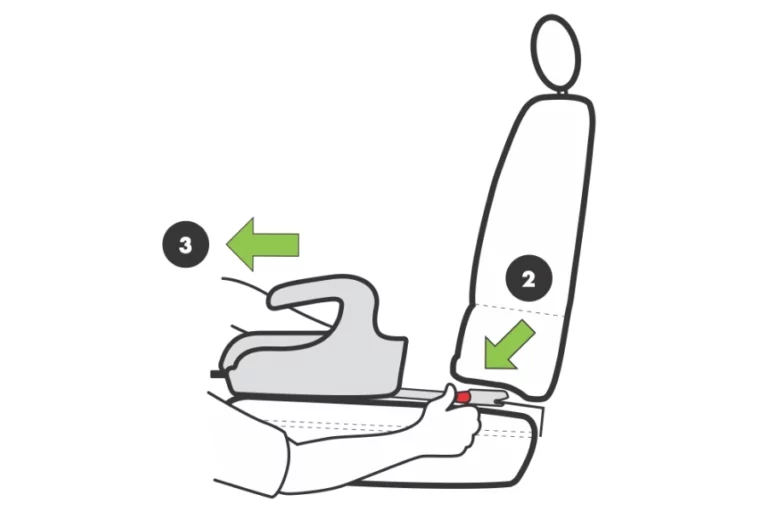
- Find the Red Buttons: Look for the red buttons on the front of each LATCH connector.
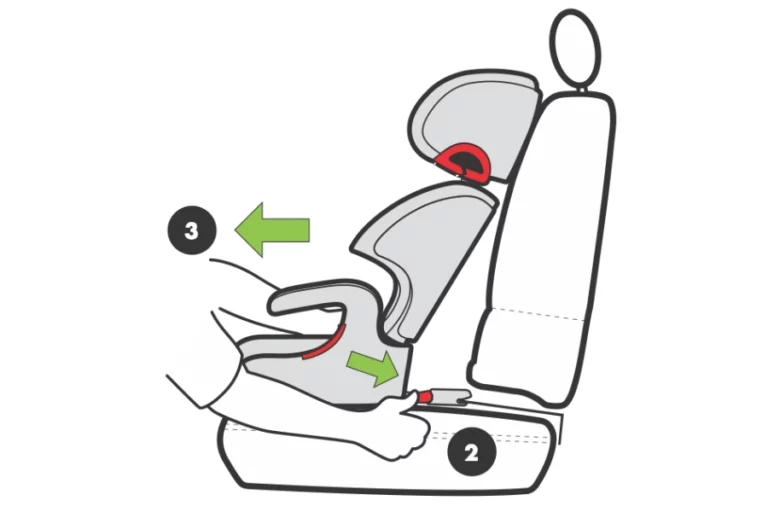
3. Press and Pull: With one thumb, press a red button to release a connector. Use your other hand to gently pull the booster seat forward. Repeat this for the other LATCH connector.
4. Lift and Go: Once both connectors are detached, simply lift the booster seat out of your vehicle.
Putting the LATCH Connectors Away (Optional):
If you want to store the LATCH connectors neatly, here’s what to do:
- Grab the recline handle again and pull it towards you.
- While holding the handle, push the LATCH connectors back into their slots on the underside of the seat base.
That’s it! Your Clek booster seat is ready for its next adventure.
How to install and remove Clek’s booster seat cup holder
Thirsty Rider? Adding the Clek Booster Seat Cup Holder
Keeping your little one’s drink close at hand is easy with the Clek cup holder! Here’s how to install it in a jiffy:
- Unleash the cushion: Lift the booster seat cushion slightly to reveal a slot on either side of the seat (these are the cupholder installation spots).
- Slide and Click: Choose a slot and simply slide the cup holder into it until you hear a satisfying click. This ensures it’s securely locked in place.
- Back to the cushion: Push down on both sides of the seat cushion until you hear another click. This secures the cushion back in place.
Voila! Your little one has a handy spot for their drink on the next adventure.
Want a visual guide? Check out a video online showing how to install the Clek booster seat cup holder.
Removing Clek’s booster seat cupholder
Taking out the cup holder is just as easy! Simply follow the steps you used to install it in reverse order.
Taking Off for Backless Adventures: Removing the Clek Oobr Booster Seat Back
Want to transform your Clek Oobr booster seat from fullback to backless mode? Here’s how to detach the back in a few simple steps:
- Lay it down: Gently place the booster seat on its side for easier access.
- Hold and Pull: Grab the release strap with one hand and the seat back with the other hand.
- Release the pigs! Pull the release strap downward. This loosens the little plastic clips (sometimes called “pigs”) that hold the back and base together.
- Back-Free! Once the clips are released, you can gently lift the seat back off the base.
Going back to fullback? It’s Easy!
To put the booster seat back into fullback mode, simply reverse the steps:
- Line Up the Pigs: Align the slots on the back with the corresponding clips (“pigs”) on the base.
- Push and Click: Push down firmly on the back of the seat until you hear a satisfying click. This confirms the clips are locked in place.
That’s it! Your Clek Oobr booster seat is ready for whatever adventure awaits, fullback or backless!
Want a visual guide? Check out a video online showing how to remove and install the back of Clek’s booster seat:
Click It In, Click It Out: Installing and Removing Your Clek Oobr Booster Seat (Backless Mode)
Keeping your child safe on the road is a breeze with your Clek Oobr booster seat (backless mode)! Here’s how to install and remove it in a few simple steps:
Installing the Booster Seat in Backless Mode:
- Get the LATCH connectors ready: Grab the recline handle on the front of the seat and pull it towards you. This will extend the LATCH connectors underneath.
2. Find the anchors: Look between the seat back and bottom cushion of your car seat for the LATCH anchors. These are usually metal loops or bars.
3. Click and connect: Line up the LATCH connectors on your booster seat with the anchors in your car. Push the connectors firmly until you hear a satisfying “click” for a secure attachment.

4. Test the fit: Give the booster seat a little tug to check it’s fastened tightly. There shouldn’t be any space between the booster and your car seat.
Removing the booster seat in Backless Mode:
- Unlock and Extend: Grab the recline handle on the front of the seat base and pull it towards you. This unlocks the seat and exposes the LATCH connectors.
2. Find the Red Buttons: Look for the red buttons on the front of each LATCH connector.
3. Press and Pull: With one thumb, press a red button to release a connector. Use your other hand to gently pull the booster seat forward. Repeat this for the other LATCH connector.
4. Tuck Away the LATCH Connectors (optional): If you’re not using the seat right away, you can store the LATCH connectors neatly. Pull and hold the recline handle again, then push the latch connectors back into their slots on the underside of the seat base.
5. Lift and Go: Once both connectors are detached, simply lift the booster seat out of your vehicle.
Olli on the Go: Installing and Removing Your Clek Olli Booster Seat
The Clek Olli is a handy backless booster seat that uses a LATCH system for easy installation. Here’s how to get it set up and take it out in a snap:
Want a visual guide? Check out a video online showing how to install and remove Olli, Clek’s backless booster seat:
Putting It In:
- Find the anchors: Look between the seat back and bottom cushion of your car seat for the LATCH anchors (usually metal loops or bars).
- Click and connect: Line up the LATCH connectors on your Olli booster seat with the anchors in your car. Push the connectors firmly until you hear a satisfying “click” for a secure attachment.
- Test the fit: Give the booster seat a little tug to check that it’s fastened tightly. There shouldn’t be much movement.
Taking It Out:
- One hand, two steps: With one hand, push the Olli booster seat slightly forward.
- Quick release: While pushing the seat, use your other hand to pull the quick-release strap. This will detach the LATCH connectors, and you can easily lift the Olli booster seat out of your car.
That’s all there is to it! Your Olli booster seat is ready for your next adventure.
Conclusion
Juggling carpools and keeping your little one safe can be a juggling act. But with your Clek booster seat, installation and removal don’t have to be part of the stress. This guide has shown you how to quickly and easily install, adjust, and remove your Clek seat, with or without a fullback, and even add the cup holder.
Remember, for specific details, refer to your Clek manual. With a few simple steps, you can ensure your child has a safe and secure ride every time. Now, buckle up, hit the road, and enjoy the journey together!